| ||||
|
| ||||
|
MAKING
A MODEL OF A MISSION
MAKING A MODEL
There are many ways to make a mission model. These are some ideas to get you started.
SCALE OF THE MODEL
The first step in making a model of a mission is to decide whether you want to construct just the mission church or the entire complex of mission buildings, and what size your model will be. Since the church will, in most cases, be the focus of your model, you will base the scale on the size of the church. For instance, if the actual church is about 150 feet long, you may decide on a scale of 1 inch = 15 feet, so that the model of the church is about 10 inches long (150÷15=10). Other buildings would be sized to look appropriate with the church. It will help if you sketch out on paper the approximate size and layout of the model before you begin construction.
BASE
Start with a sturdy flat base, large enough to hold the size of model you have decided to build. The base needs to be heavy enough to support the weight of the model, but light enough for you to move it easily. Possible bases are plywood, heavy cardboard, plaster board, heavy plastic, or styrofoam. Be sure that the base is rigid enough that it won't buckle under the weight of the model when you pick it up.
BUILDING MATERIAL
The two most common building materials for a mission model are clay and cardboard.
Clay: Clay can either be made at home or purchased at an art supply store. 25 pounds of Aardvark (brand) modeling clay costs about $6 and comes in two colors: sand, and terra cotta. This clay dries in the air or it may be kiln fired, but not baked in a regular oven.
Clay can be made using any of a variety of recipes. Here's one called Baker's Clay: Mix 4 cups of flour, 1 cup of salt, and 1 2/3 cups of water. Tempera paint may be mixed in to make colored clay. This clay can be rolled out and shaped into forms. It can be baked in an oven at 325 degrees for two hours. Other recipes for making modeling clay are in the book Recipes for Art and Craft Materials by Helen Sattler (Beech Tree Books, 1994, $4.95). Some require cooking the mixture first, others use boiling water. Most will dry in the air.
Be careful when you heat water or use the oven.
Have an adult check your procedure before you begin.
Clay
can be used to make small "adobe" bricks using a match box or other
small container as a mold. If you dry or bake the bricks first, you can build
walls of bricks by cementing the bricks together with damp clay or with glue.
Build walls by off-setting each row of bricks for stability.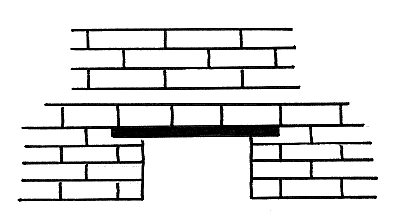
You can make spaces in your adobe wall for windows by building up on each side of the opening and bridging over the top with popsicle sticks or cardboard. You will need to use half-bricks to create straight edges along door and window openings.
Clay
can also be used to make flat wall sections by rolling or patting it to the
right size. Keep the flat pieces rather thick (at least ½
inch) so that you can stand them on edge and pinch the edges together at right
angles, to form intersecting walls.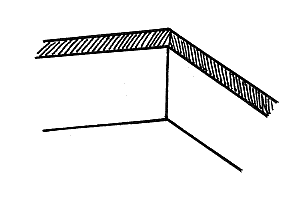
Cardboard: Either flat pieces of cardboard, cut and fastened together, or cardboard boxes can be used to make a model. Cardboard boxes come in every shape and size, and are a quick source of building material. Consider a shoe box for the main part of the church, a quart milk carton for a bell tower, or a section of a cereal box for a long building facing a mission patio.
 Flat
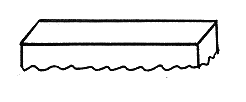
cardboard can be cut into rectangles for each wall, and then taped together
at right angles to each other, to make a box. Or you can "score"
the cardboard instead of cutting it by using a knife or one blade of the scissors
to press down on the cardboard and create a groove. This lets the cardboard
bend easily and makes neat corners. It is also a good method for making doors.
Cut three sides of the doorway all the way through, but "score"
the hinge side so it will open and close. Another way to make a door hinge
is with tape.
Be careful any time you use scissors or a knife to cut cardboard or styrofoam.
Have an adult check your cutting method before you begin.
Other Building Materials: You can build a mission model out of many things, like
Sugar cubes (use as bricks).
Styrofoam (purchase sheets to cut for walls, or use irregular-shaped packing material that looks right to you).
Sponges (purchase large flat ones and use them like cardboard for walls. They stand up well, are light weight, easy to cut, and have a nice rough texture).
Balsa wood.
Wooden blocks and Lincoln logs.
Cake or gingerbread (hold the walls together with icing).
You may think of even more building materials.
ROOF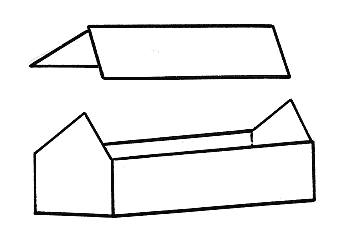
A piece of lightweight cardboard folded in half makes a roof shape.
If you have shaped the end walls of your building with gable peaks, they will support the roof.
For a thatched roof, use actual straw or reeds bundled together and tied with string, then glued to the cardboard. Paper drinking straws or broom straws are an easy substitute for reeds.
For a tile roof, use corrugated cardboard (with the top flat layer of paper torn off to reveal the ripply corrugated part). An alternative is to glue macaroni to the flat cardboard, or cut "tiles" of reddish-brown construction paper and glue them in overlapping rows on the cardboard.
WALL FINISH
Clay walls will look authentic, but cardboard or box walls may be too smooth and may have writing on them. You can cover the cardboard with brown wrapping paper, or with paint. You can give it a rough, adobe-looking surface by putting a layer of salt-map mixture over it. (1 cup salt, 1 cup non-rising wheat flour, 2/3 cup water; mix flour and salt, add just enough water to make mixture the consistency of thick icing.) A thin layer spread on the cardboard walls will dry within a day.
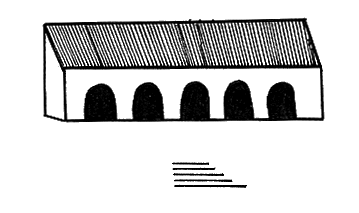 Some
mission buildings had long porches or walkways supported by arches along the
outer side. Cardboard is easy to use for a porch because arches can be cut
in it. Slant the ends to support a shed roof over the porch.
For stairs leading up to a door, glue together layers of cardboard, each smaller than the one beneath it.
DETAILS
Bells: Look at Christmas decorations for small bells that will be the right size for your bell tower or bell wall. Small paper cups may also work, or the mini-size baking cup liners from the grocery store.
Gardens: Bushes can be made of green sponge, or bits of real plants set in dirt in bottle caps. Cardboard bushes or trees will stand up if you put a tab on the bottom, bend it at a right angle to the bush, and glue it to the model base.
Other Details: You can add many details to your model. You might make a fountain, perhaps using spray bottle caps. If you want to put furniture inside the buildings, you can have the roof section removable so the furniture can be seen.
You can put people in the buildings or working around the grounds. Doll house figures or pipe-cleaner people dressed in bits of cloth can be used, or you can make cardboard people.
There is lots of room for creativity when making a model of a mission. Think about what is unique about the mission you have chosen to model, and then consider how you can create that feature. Look around you for bits and pieces that are the right size to become a part of your mission model.